BASICS 2: EXPOSURE
Hello again, so, in the world of cameras; what is exposure?
Well as in our first post it can be defined as:
- Measurement of light falling on the camera sensor in f-stops (iris/aperture), fractions of a second (shutter speed) and decibels/iso (sensor sensivity)
There are quite a few ways of controlling the amount of light falling onto the sensor:
- Iris
- Shutter speed
- Gain/ISO
- ND filter
- Physically lighting or shading the scene
So lets look at them one at a time:
IRIS
Every lens has a measurement of the maximum opening size of its iris stamped onto it, usually on the front. This is measured in f-stops and represents the widest the iris can open – and so the maximum amount of light it can let in. For instance, a lens marked f1.7 has a large opening iris and can let in plenty of light helping the camera in dark scenes. A lens marked f5.6 does not have a particularly large opening iris and so will struggle to get enough light onto the sensor in dark conditions. Some zoom lenses will have two figures marked i.e. f3.5-5.6 – this means that when the zoom is at its widest angle the iris can open to f3.5 but zoom in and it will only open to f5.6.
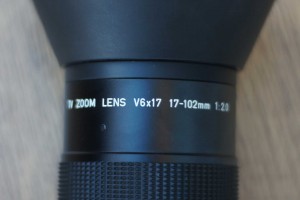
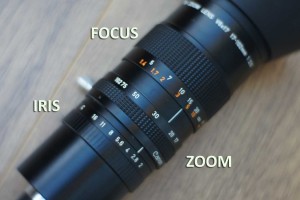
For film makers having two different f-stop markings means that the scene will get darker as you zoom in – not a desirable feature. Video camera lenses are designed to have a ‘constant f-stop’ that is to maintain the same iris opening throughout the zoom. But, this makes a lens more expensive, and so cheaper stills camera lenses which are designed for taking single images compromise with a varying f-stop. This means that DSLR users will have to compensate in some way when using a zoom lens without a constant f-stop. Just for comparism the lens below is a fully professional television lens. It has a fixed aperture of f2.0 which you can read on the end of the lens, marked 1:2.0
If you look at the iris ring – usually the one nearest the camera – you can see that you can go from closed (c) to fully open (f2.0):
SHUTTER SPEED
To understand shutter speed when shooting video we first need to understand how many frames a second make up the moving image.
Please refer to the Frame Rates tutorial for a detailed explanation of frame rates. However, for the purposes of this tutorial all you need to know is that in Britain we either use a frame rate of 25 or 50 frames per second
Because of this there is a standard shutter speed for video. We default to a shutter speed of 1/50th – holding the shutter open for a fiftieth of a second for each frame. This uses the maximum amount of time available for each frame.
However, going for a slower shutter speed will get extra light into the camera which may be useful when filming in very low light – 1/30th will be quite useful but any longer and you will start to see movement stutter in the frame.
Going for a faster shutter speed may be useful on bright sunny days to let less light into the camera – you can then open the iris and create shallow depth of field effects…
GAIN/ISO
ISO (International Standard Organisation) is the sensitivity of the capture medium – originally devised to record the sensitivity of different film stock it now is an equivalent measurement of how sensitive the camera sensor is. For both film and sensor the lower the ISO number:
- the more sensitive the medium
- the brighter the image
- the grainier the image
ND FILTER
ND stand for Neutral Density: any filter labelled ND does not change the wavelength or colour of light – purely its intensity.
ND filters are dark filters used to cut down the amount of light entering a camera.
On professional video cameras up to three are selectable by turning a knob by the lens – this turns the different grades of ND over the sensor.
In stills cameras ND filters are screwed onto the front of the lens.
ND filters can also be mounted onto stills cameras or video cameras in a matte box attached to the front of the lens.
It is now possible to buy adjustable ND filters – that is two filters mounted on top of each other which when one is twisted the pair get darker. This is very useful outside on a sunny day as the iris can be set fully open for shallow depth of field and the ND filters used to adjust the exposure. They are of limited use inside as they are never completely clear and will always restrict a certain amount of light.
PHYSICALLY LIGHTING OR SHADING THE SCENE
Of course to brighten your scene you can add lights. Modern cameras are sensitive enough to mean that lighting a scene is no longer a necessity but good lighting can give depth, clarity and drama to your productions.
In early cinema, shooting outside in California, the sun could be overwhelming – so they used to shade the scene with canvas canopies to maintain control of the light levels. If they needed to let more light in, a man with a pole used to pull open a flap – according to folk lore the pole often used was a fisherman’s gaff – which led to the head of lighting being known as the Gaffa! However, the term is more likely attributable to British cinema where a slang word for boss has always been; the Gaffa.
AUTO EXPOSURE
Auto exposure settings on cameras will adjust all of the above automatically. Therefore, to get a good quality image always look for well lit places to shoot. Otherwise the camera will start to change the shutter speed and bring in electronic gain – this will lead to grainy images.
Try not to shoot where there are big differences in light levels – i.e. in front of a window you subject will become silhouetted.
Once shooting don’t move the camera around this will lead to the brightness of the shot automatically adjusting and distracting the viewer.
As with focus our two golden rules while using auto exposure are still the same:
- ‘move’ camera or location until the camera gives you a good looking shot
- ‘don’t move’ once recording to prevent the setting changing mid shot
Leave a comment
Categories
Tutorials
Or maybe, wanting to jog your memory on a few key points?
Well here in Tutorials we'll walk you through how to consistently capture professional quality video whatever camera you are holding.
Start at the top - these posts are sorted for you to work through from top to bottom...


